French Silk Pie with Gluten Free Crust
Ingredients
Crust
- 1/4 cup blanched almond flour*
- 1/2 cup + 2 tablespoons coconut flour*
- 1/4 teaspoon sea salt
- 1/4 teaspoon baking soda
- 1/4 cup unsalted butter (1/2 stick) softened
- 1/4 cup honey
- 1 egg
- 1 teaspoon vanilla extract
Filling
- 4 oz unsweetened baking chocolate
- 1 cup unsalted butter (2 sticks) softened
- 1 1/2 cups granulated sugar
- 1 teaspoon vanilla extract
- 4 eggs grade A or AA
Topping
- 2 cups heavy whipping cream cold
- 2 tablespoons confectioners (powdered) sugar
- 1 teaspoon vanilla extract
- Chocolate curls, mini chocolate chips, or cocoa powder for topping (optional)
Instructions
For the Crust
-
Preheat oven to 350F.
-
Start by making the crust. Measure your almond and coconut flour carefully, you do not want them to be "packed down" in your measuring cups. Combine all of your dry crust ingredients in a bowl and set aside. In the bowl of a stand mixer (or a mixing bowl if using a hand mixer), combine all of the wet ingredients.
-
Beat wet ingredients on medium speed until they are mostly combined (a few strands of unincorporated butter is fine), and start adding your dry ingredients. Slowly add dry ingredients to prevent a flour covered kitchen while continuing to beat on medium. Once combined it will be slightly crumbly, but not dry.
-
Press crust into a ceramic pie dish, covering the bottom and up the sides. It doesn't look like it will cover the whole thing at first, but it will (and it puffs up during baking, so it's not too thin, I promise). There is no need to grease the pie pan because the butter in the crust will be enough non-stick.
-
Bake the crust for 15 minutes or until golden, and then set on the counter to cool completely while you make the filling.
For the Filling
-
Melt chocolate in the microwave (start with 30 seconds, then stir, and add another 20 seconds if needed), and stir until smooth. Set aside to cool, but not solidify.
-
Add butter and sugar to the bowl of a stand mixer (or a mixing bowl if using a hand mixer) and beat on medium-high, occasionally scraping the sides, until the butter lightens in color and starts to look fluffy.
-
With the mixer on medium, add the vanilla extract and the melted chocolate. Beat to combine.
-
Keep the mixer on medium and add your first egg, let it beat for about 3 minutes before adding your next egg. You'll notice the color of the filling getting lighter with each egg.
-
Continue adding the eggs and beating for 3-5 minute intervals between additions (you're looking for the mixture to get lighter in color and a little fluffier with each egg addition, you will need less time with a stand mixer than you will with a hand mixer). This is important even though it sounds like a lot of time. For the first few eggs, your filling will still be grainy from the sugar, but as you continue to beat it, it will become smooth and beautifully buttery.
-
Scrape down the sides of the bowl and beat for another few seconds to make sure everything is combined.
For the Topping
-
Add all ingredients to the bowl of a stand mixer (or a mixing bowl if using a hand mixer). If it's particularly hot in your kitchen, you may want to chill the bowl and beaters first.
-
Beat on medium-high until medium peaks form (when you take the beater out of the cream, the tip of the cream on the beater should almost stand straight up and not completely flop to one side).
-
Once you have medium peaks, stop whipping the cream or you'll end up with butter!
To Assemble
-
Pour the filling into the completely cooled pie crust and smooth out with a spatula.
-
Refrigerate for at least 2-3 hours before serving. This pie is delicious right away, but is totally super amazingly buttery once chilled for several hours.
-
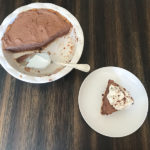
Top with whipped cream when ready to serve and your chocolate curls, chips, or a dusting of cocoa powder.
-
Keep refrigerated.
Recipe Notes
*I used Blue Diamond brand almond flour and Arrowhead Mills brand coconut flour. These are both available at most major grocery stores. You can use any brand you want, but the texture may vary slightly.
Why sea salt? Normally in my recipes I call for kosher salt, but because kosher salt changes so much brand-by-brand it doesn't always provide consistent results. While that is okay in most recipes, in baking recipes, exact amounts matter, so I call for sea salt because the salt granules will be more consistent from one brand to the next. I NEVER recommend table salt for any recipe because it has added iodide that gives it a bitter flavor.
If you won't be serving the pie right away, you may want to wait to make the whipped topping so it doesn't deflate. If you are planning to serve some now and some later, keep the whipped topping separate from the pie and re-whip if necessary.